ThePartyWorks.com - Birthday Party Supplies

Wednesday, November 26, 2008

Breadmaking - Sweet Dough Recipe (cont)

Red Bean Buns


  • Roll dough flat
  • Place red bean paste into the centre
  • Wrap dough around red bean, ensuring that the edges are properly pinched together
  • Leave for about an hour
  • Brush with egg
  • Sprinkle with flax seeds
  • Bake in preheated 200 degrees C oven for approximately 10 - 15 minutes till golden brown. If using oven with fan, then bake at 180 degrees C for 8 - 12 minutes.

n.b. Red bean paste can be substituted with mung bean paste or durian paste.

Flax seeds can be substituted with poppy seeds or sesame seeds.


Cranberry minis

  • Roll dough into a flat and rectangular shape (see pic 1)
  • Sprinkle cranberries over flattened dough (see pic 2)
  • Roll dough along its length
  • Cut into two and place on greased baking tray (see pic 3)
  • Leave for about an hour allowing the dough to rise again
  • Brush with egg
  • Bake in preheated 200 degrees C oven for approximately 10 - 15 minutes till golden brown. If using oven with fan, then bake at 180 degrees C for 8 - 12 minutes.


n.b. Cranberries can be replaced with raisins or other dried fruits of your choice.

Breadmaking - Sweet Dough Recipe

Sweet Dough Recipe


Ingredients:-

200 ml Water + Egg (egg optional)
4 tbsp Sugar
2 tsp Yeast
350g Bread Flour
2 tbsp Milk Powder (optional) (can be replaced with cocoa, milo, ovaltine, etc)
3 tbsp Shortening (can be replaced with butter or margarine)
1/2 tsp Salt

Method:-

Put all the ingredients in a mixing bowl and knead into a dough. Dough is ready once it looks smooth.

Leave dough to rest for an hour or two, depending on the surrounding temperature. Dough should double in size.


Dough immediately after kneading

One hour later...


Once dough has increased to double its size, you can work on it.

Divide dough into small portions. I prefer to make mini buns which would require 16g. Or if you want to make bigger portions, you will require approximately 30g.


Chicken Floss Bun

  • Divide dough into portions of 16g or 30g
  • Shape into balls by pinching the dough
  • Put balls of dough onto greased baking tray about 2 cm apart.
  • Cover and leave to rise for about one hour
  • Brush with egg (optional)
  • Bake in preheated 200 degrees C oven for approximately 10 - 15 minutes till golden brown. If using oven with fan, then bake at 180 degrees C for 8 - 12 minutes.
  • Cool the buns
  • Slit the centre of the buns
  • Spread mayonnaise in the centre and top of the buns
  • Coat buns with chicken floss


Unbaked .................................Coated with mayonnaise & chicken floss


Hotdog Bun

  • Divide dough into 16g portions
  • Roll dough lengthwise (like a pencil)
  • Wrap dough around mini cocktail hotdogs
  • Ensure ends of dough are 'tucked in' to prevent them from opening up
  • Leave to rise for about one hour
  • Pipe mayonnaise and tomato sauce on top (optional)
  • Bake in preheated 200 degrees C oven for approximately 10 - 15 minutes till golden brown. If using oven with fan, then bake at 180 degrees C for 8 - 12 minutes.


This is plain without the mayonnaise and tomato sauce


Look out for the next post for more ways of utilising the sweet dough recipe.

Breadmaking

Just attended another course in breadmaking and find that it is really simple to do. As compared to cake making, there is much less equipment to wash.

Bread making is an age-old tradition. It has remained largely unchanged over the centuries. In the last few years bread making has become more popular with more and more of us enjoying the quality of real homemade bread. We all know that there is nothing like the satisfaction of baking from your own specially chosen ingredients and being creative in the choice of ingredients.


The smell of freshly baked bread is something that I love. It brings back fond memories of my childhood visits to the bakeries with their huge ovens and I will patiently wait for the bread to be taken out from the oven. Yummy...

Once you have all the ingredients, voila!!! Just put them into the machine, if you have one with the dough hook, and it does all the kneading for you. If you do not have a machine, you can still knead the dough by hand. Of course, this will require a little more effort on your part. However, this is not impossible and many actually knead the dough manually.


Dough hook
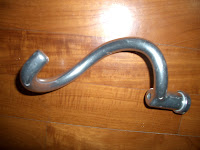

As long as you measure the ingredients accurately, breadmaking can be fun and is simple enough to be done by anyone. Do give sufficient time for the dough to rise. If working in a warm environment, that might take about one hour. If the temperature is cold, it might take double that time for the dough to rise. Best if you could place the dough near a sunny draught free window or a shelf above a warm oven.

Breadbaking is in fact a hobby that anyone can take up easily. There is nothing intricate or complicated about breadbaking. In fact, I personally find that breadbaking can be a stress reducer and I can be as creative as I want to be. There is no limit to creativity.

An example of what I have done:- buns filled with pineapple jam. Have not seen this in the shops yet. ; ) I shall be experimenting with buns filled with durian paste and maybe even pistachio paste soon.

I used to be afraid of breadbaking as I thought that it would be very difficult. I was intimidated by the very thought of the process of breadbaking and did not realise that it really is easy to bake bread. Of course, you need to get the ingredients which are readily available at shops selling baking items and supermarkets. This goes for the yeast as well, which is a staple in breadbaking.

Baker's yeast is the common name for the strains of yeast commonly used as a leavening agent in baking bread. Basically, yeast allows the resulting bread to be lighter and more tasty than the normal flat, hard cake.

I not only enjoy being creative in coming up with new creations of bread, but find that homemade bread is fun to make and eat as well. There are so many types of bread that you can make as in rye, wholemeal, corn, cinnamon, multi-grain, etc... Then you have red bean, mung bean, tuna, sardine, curry, chicken floss, cheese, ham, hot dog, otak, kaya, raisin, etc... The varieties are endless.
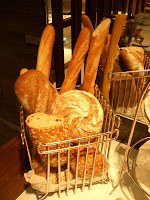

The best part in homemade bread is to be able to eat freshly baked bread that is chemical and preservative free. In today's world, this means a lot to me especially in the recent cases where tons of food had to be recalled due to improper ingredients discovered. So baking and eating your own bread ensures that all is safe and that the best ingredients are used.

Look out for a basic bread recipe that will be posted soon...

Friday, November 21, 2008

Recipes for X'mas - Pineapple Tarts

Tis the season to be jolly.....

christmas border Pictures, Images and Photos
X'mas is slightly more than a month away & many will be starting to prepare for the festivities of the season soon.

Here is a recipe for Pineapple Tarts that I love and which many have tried & ordered every single year.

Ingredients:-

A
114 g plain flour
114 g self raising flour

B
142g butter

C
1 egg
1 tsp cold water

D
egg wash (beaten yolk/milk)

E
500g - 750g pineapple jam (can be bought from supermarkets & shops selling baking items)


Method:-

Sieve A.
Mix A and B with fingertips till crumbly.
Add in C and knead into a dough.

Wrap in plastic foil and refrigerate for 30 minutes.

Roll dough till slightly less than half a cm.
Use cookie cutter to cut into shapes.
Place on greased baking tray (or baking tray lined with baking sheet).
Bake blind in preheated 190 degrees C oven for 15 minutes.

Remove from oven & brush with egg wash.
Roll the pineapple jam into balls and place on baked dough.
*Optional:- place design on top of jam
Bake in preheated 190 degrees C oven for 5 minutes.

Remove from oven and leave to cool before storing in air-tight container.

Makes approximately 50 little pineapple tarts.
The amount of pineapple jam is up to you. I prefer using more jam so much so that one of my friends calls them "jam-on-tarts". My brother refers to them as "Dolly's Glory".

christmas border Pictures, Images and Photos

Tip:- Especially when making large quantities, I use the universal blade of the Braun machine that I have to knead A & B and mix with the egg and water mixture. This really saves a lot of time and energy.

Thursday, November 13, 2008

Learning To Bake Home-Made Bread

Yesterday was the first time I was in touch with breadmaking. Have never baked breads at all even though cookies & cakes & even jellies have been done with so much frequency.

How did I end up at a breadmaking course?

Well, I was tempted to attend the course as the amount that I paid for the course went to pay for nourishing the under-nourished children in poor countries. Since this was a small way where I could help in doing my bit for charity, and still be able to learn a new skill, I thought it very apt for me to go for it!

Hesitantly, I made my way to the condo where the class was held. As it was at the other end of the island, I gave myself ample time so as not to be late. In fact, I was the first person to reach the place.

There were altogether approximately 12 of us. We were shown what our course fee bought for the under-nourished children and were told that each of us had helped to feed an under-nourished child for two months. That felt good although we knew that just feeding a child for two months would not go far in eliminating the poverty cycle. There was still much that could be done.

We learnt how to bake two types of bread:- Italian Dough and English Dough. With the Italian Dough, we were taught how to make Rosemary Focaccia as well as Pizza. Plus the variations that we could do as in sundried tomato or garlic herb option. At least now I know what is the name of the finger stick that I used to love so much at Pizza Hut called. ; )

For the English Dough, we were shown how to make Cranberry Teff. Of course, we could also use chocolate or pecan nuts or whatever we fancy since bread making is all about our own creativity as well.

I never expected breadmaking to be so simple. Of course, it takes time to let the dough rise but you can always do something else whilst waiting for the time taken to allow the dough to go throught its first rising and final rising before the actual baking.

Have always loved eating bread since I was young and I have finally found out how to make my very own bread! Should be able to try baking my own bread soon...